Use Ideas:
- Use them as Monthly Calendars by filling in the month and numbers (and if you get a blank one, you'll also have to fill in the days of the week either permanently before you frame it or wait until it is framed).
- Use them as Weekly Schedulers by filling in times or family member names down the side.
- Use them as Monthly Goal Trackers by filling them in as a Monthly Calendar but write your goal at the top and the month along the side.
- Use them as Weekly Goal Trackers to track multiple goals or separate goals for different family members by filling in the goal or person at the start of each row.
- Use them as Weekly Food Diaries by filling in your meal times along the side and then what you ate in the corresponding square for the meal and day of the week.
Frame Selection Tips:
Keep it simple but durable! Mine are framed in simple black poster frames that are sturdy enough with solid enough hangers on the back that they can stand up to being removed from the wall when I'm in scheduling mode or need to switch months. I spent about the same to get more durable poster frames by waiting for frame sales at Michaels or using coupons.
Get plastic instead of glass if you can. The frames I bought come with glass in the smaller ones but plastic in the larger ones so I've had the opportunity to try both. I like the plastic better because they make the whiteboard calendar lighter (and thus more mobile) and easier to photograph (less glare). Anti-glare glass is usually also conservation quality designed for watercolour originals, numbered prints, and the like (so extremely good quality and priced accordingly). You want to write on these...so go with something you'll be happy to write on!
Choose the frame colour/style for versatility! You might want to get a frame that will match the room decor rather than the piece so if you want to change the calendar print next season, you don't need a new frame for it. (Again, this is the opposite of what to do with original pieces of art.) You may want to stick with a simple black or white frame because you'll likely be writing on the piece in black whiteboard marker anyway. Alternatively, you may want to get wood frames to match your table, cabinets, desk, or bookshelves.
Pro Tips
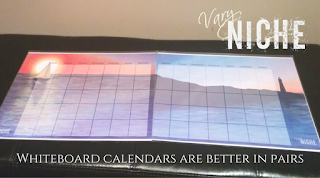
Get two or more: Whiteboard calendars are fabulous, versatile, and reusable but I always find I need to look ahead into the next month or week for scheduling. If you get two and hang them together as a set, you can rotate them so you always have the current month and next month in view.
Photograph last month/week before erasing it: I love how environmentally friendly these are but I miss being able to look back at past weeks or months for notes I wrote on my conventional calendar. The need to photograph them is one reason I prefer to have mine framed under plastic instead of glass.
More About How I Made Them
In some cases I taped the grid off and then painted with watercolour over the top (as I did with the magnolia calendars pictured below). In other cases I did a watercolour painting with the intent to digitally add the calendar aspects afterward (as with the veggies one above).
And in a few cases, I digitally added the calendar aspect to landscapes I previously painted (like the set below which are prints of acrylic paintings, "Sailor's Delight" and "Sailor's Guide").
My calendar prints come unframed so that you can match your frame to your needs but in order to make them a Whiteboard Calendar, you do need to frame them.
I hope you found this helpful. If you don't already have a whiteboard calendar print or don't have enough, you can shop here.
If you've come up with more uses or tips, please do share in the comments!


